Saturday, January 27, 2018

Valentine's Day MiniCupcake Bouquets

Hi Boise and Meridian friends! I am selling these cute bouquets this Valentine's Day season here locally. Everyone knows that the way to a man's heart is through his stomach, so give him a gift of yummy mini-cupcakes disguised as valentine's flowers. And lets be real--if most women are like me, the way to our heart too can very well be through our stomach, so get one of these for your wife--it is a great combo of the beauty of fresh flowers and the yumminess of baked goods.
Each bouquet comes with approx. 25-27 minicupcakes made from my delicious chocolate fudge cake recipe, and frosted with a vanilla buttercream. They come in a 4.5inch diameter glass vase filled with yummy valentine's cherry heart candies, conversation hearts, M&Ms or Hershey Kisses (please specify which kind you would like in your email.)
These bouquets are on sale for $40 this season, check or cash at pickup. They will be ready for pickup on Valentine's Day (I am located near Eagle and Amity crossroads). I can only making so many this year, so email now to reserve yours for all the spots are gone! pattycakesbakery@outlook.com

Happy Valentine's Day!

Monday, January 22, 2018

Let's Put the Art in Party

We put the Art in Party this year for Princess 1 and 2's birthdays. They love art and all the fun and mess that comes with it. This was a really fun party to plan, and as you all know, my first thing I have to plan is the cake! We love cake around here!
 Drip cakes have really gained in popularity over the last year or so, and after I attempted my first one on the Willy Wonka cake with some success, but not quite the smooth drip look I wanted, I was bound and determined to try it again. This time I used candy melts to make my ganache drip instead of chocolate chips so I could get all the pretty colors. I filled up some squeeze bottles with them and used that to control the drips as I went around the cake instead of an angeled spatula. I also kept the ganache a little thinner this time, and with those things changed up it worked a lot better, and I just love these drips because of all the fun colors. Dripping paint never looked quite so appetizing, right?!

We kind of had a paint can theme running through the cake and decorations, so the top tier of this fellow was a six inch round cake made to look like a paint can.

I made a painters art pallet, paint brush,  and box of crayons out of fondant to display their ages and add a little more artsy charm to the whole cake. The kids all fought over who got to eat those parts first!
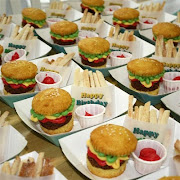
We also carried the whole art theme through to all of the snacks we had for the budding artists that came.
Some rainbox twizzlers hanging out of a small paint can for our paint drips, and some juice boxes for the creative juices these kids need to quench their thirst.

A bowl of paint chips was simple enough to add, and then these cute rice krispie paint brushes were a smashing success with these kids. They were so easy to do too--just dip rice krispie treats in some of the leftover candy melts used on the cake and let dry standing up. Insert a large Popsicle stick for the handle, and you are good to go.

We also glued crayons around an empty tin can to hold the silverware and had some fun paint brush napkins
 The rest of the decorations for the party were so fun to do. I hung a couple of paint cans we got at Lowes from the ceiling, and then got a couple of bright plastic tablecloths that I taped inside the cans and had flowing down onto the food table like paint spilling from the cans. The Happy Birthday garlands were simply made by cutting up paint chips from Walmart and brush painting the letters onto them with black paint.

 We also used the paint chips for a party sign on the front door, welcoming guests.
Perhaps my favorite part of the decorations was the canopy of colored streamers hung over the kids' table. I love all the colors! I loved it so much I kept it up in my house for over a month after!  Finally when it was time to decorate for Christmas, I reluctantly pulled them all down.
 Here's a behind the scenes shot of the canopy in progress. Our ceilings are much taller in our new home than our previous couple. I pulled out the ladder for this bad boy, and got it all done while my husband was at work. He was pretty impressed when he got home and found the canopy done (and I'm just glad he didn't come home to find me with a broken neck from falling off the ladder...let's just say I had a couple near falls. All's well that ends well though!). And Princess #3--she insisted on posing with the decor for the camera!

 Now the setup is complete. Time for the actual party! There are so many different crafts and activities you can do for an art party. The problem is trying to narrow them all down to just a few you can do in your time frame. When guests arrived, they each received an art smock to wear, then they picked a place at the table where a name card was waiting for them to add their name to and decorate however they pleased. We made the cute little easels for all the cards out of Popsicle sticks and hot glue.
 I knew that with art projects, some kids take longer than others to finish their project, so we needed a couple activities that those that finished early could do while others finished their art. After the name cards we played Paint-Spot Twister (i.e. "put your left foot on the green paint spot" etc.). That was a hit with the kids, and it also gave me a little time to clean up mess number one and get project number 2 all ready for the kids.
 Our second art project was our main one of the day. Each artist got a canvas and a palette of  paint to use to create whatever picture they fancied. Some did sunsets, some put painter's tape down in the shape of their initial and painted over it, some splattered paint all over, and some (like my 4 year old) added all the paint they were given and mixed it all together until their entire canvas was just gray. And the cute things is they thought their project was a total masterpiece. And you know what, to this mama it was!
While we cleaned up from that project my hubby helped the kids play a few rounds of pictionary--that seemed like a very appropriate game to play at an art party.

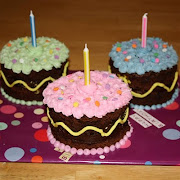
This is what I was getting ready for all the kids during that--time for them to let their artistic juices flowing on something edible. Some were very meticulous in decorating their cupcakes, while others just dumped every single sprinkle they were given on their edible canvas. No matter what the approach, it all tasted good in the end!
After that it was time to sing and blow candles out, eat food, and open presents. We had a masterpiece of a time with all these little artists. I think I see a few mini-Picassos and Van Goghs in the mix!

Sunday, January 21, 2018

Charlie and the Chocolate Factory Birthday Bash--A Wonkalicious Party

Princess #4 turned 1 on her golden birthday last year. I was racking my brain on what to do for this important party. #1 is an important party in and of itself, but it being her golden birthday (which my older 3 kept bringing up and kept saying it had to be a really cool party because of that) I knew I had to deliver. Then it hit me--her name is Charlotte, and we sometimes call her Charlie. Why not a Charlie and the Chocolate Factory Party to celebrate her Golden Birthday?
I got right to work finding these chocolate candy bar wrappers online, then making a golden ticket invitation to put inside all of the chocolate bars to give out to all of our guests to invite them to her special day.
I found some fun, shimmery gold paper to print them off on. The trickiest part to the invitation was getting them delivered to everyone without them melting in the hot Texas June weather!

I heard from numerous friends that the invitation was a total smashing hit with their kids. Some even thought they really got to go to Wonka's chocolate factory like on the movie. Sorry to disappoint you kids, but you just get to come to my house. We'll have fun though, I promise!
I think why my kids were so excited for this theme for their baby sister's party is because they knew that there must be lots of candy if it really is going to be a Willy Wonka party. And oh boy were they right. It started off with the birthday cake. 
I iced it in a Wonka purple buttercream, added chocolate ganache drips like the chocolate river dripping down the cake, and topped it with all sorts of yummy things--chocolate candy bars, lollipops, and smarties to name a few.
Just looking at the cake could send someone into a sugar coma!

The fun didn't stop there. I made these cute little edible teacups out of sugar cones, cookies, and pretzels. Just soak the end of the cone in water for a few seconds, then carefully cut that part away. Use a little melted chocolate to glue the cone to the cookie (and fill in the cookie's hole if it has one, like mine did). then glue a piece of a rounded pretzel to the side for the handle. I filled the cups with a homemade chocolate mousse. These were probably the biggest hit out of all the food, at least for the adults (candy was still probably the favorite for the kids).
Of course if you are having a Willy Wonka party, you've gotta have some Fizzy Lifting Drink! No kids flew away though!
I found these fun papers covered in edible sugar dots at the craft store. It was perfect for our lickable wallpaper.


A Dum-dum tree planted in a bed of everlasting gobstoppers does sound delicious. I wish that tree really grew in my backyard! There were also several other jars filled with different kinds of candy and chocolate treats. Yum!
Since it was her first birthday, we needed a smash cake for her to have to herself. I made a little golden ticket for her, with gold edible luster dust sprinkled over the yellow buttercream.
I also found a Wonka bar wrapper made for mini candy bars. This was a great project for older sisters to help with!
I love decorations, and these ones were so fun to do! The lollipops were made out of pool noodles and duct tape, then wrapped in cellophane. There is a great tutorial for them here. The hard candies that were hung from the ceiling were simply colorful chinese lanterns that were wrapped in cellophane. And a golden ticket sign finished off our background.

A sign on the front door welcomed our guests to our Charlie's Chocolate Factory.

We had a few activities for the kids to do while the adults all visited. I made these photo booth props for kids and adults to take their picture in, using our Wonkavision television. Are you a good egg or a bad egg?

We also tied Violet Beauregarde blueberry balloons to each kid's ankle and they tried to smash each other's blueberry, without getting their own blueberry smashed. Some of those kids were ruthless trying to smash each other's blueberries!

The cake smash was a great way to end our party--and after all that sugar this little one was ready to have very sweet dreams, and we were very ready to send those sugar filled kids home with their parents 😉
It was a special Golden Birthday for this cute one  year old! So fun to celebrate Charlie's birthday at our very own Chocolate Factory! (and yes, I dressed her in orange in honor of the oompa loompas, whose help made this whole party possible 😉 )

Thursday, January 18, 2018

Chess Board Cake


This birthday cake took some good advance planning--not so much on the cake side, because it was pretty easy to make and assemble after ordering a couple of chess molds from Amazon for the chess pieces and squares on the board--but more so that I had to learn to play chess. I have never known how, but my husband grew up playing chess and loves the game. He's never been able to play against me, though, so I thought it would be fun to surprise him with a chess board cake and then play against him on the cake--interactive cakes are the best! I was visiting some family the month before with the kids while hubby was home working, and I convinced my 2 teenage nephews to sit down and teach me chess. Goodness those boys were patient with their slow aunt, and helped me through the basics of it, and let me practice on them. I even won one game against them...they may have let me, I'm not sure, but I'll take the win with a proud smile on my face!

The longest part of making this cake is probably taking them time to make all the pieces in the molds with candy melts. It took a lot of chocolate...I think it was almost 32 oz of white and 32 oz of dark chocolate. One those were all done all I had to do was bake and frost a 12" cake in some dark chocolate ganache and then put all my little squares on one by one. If you are wanting to go the extra mile, you could always bake the inside of the cake to resemble a chess board (I have one of those kinds of cake to show you coming up on my blog), but I only wanted my board to be 2" high so it looked like a real board. 

 When hubby got home from work on his birthday he was both totally surprised by his cake and that I actually knew how to play the game. He sat down at once to play me...I put up a good fight, but in the end as you can see, it was checkmate on me (I don't even know--is that the right way to say it? I still have a lot to learn). I guess it was good that the birthday boy won. We'll just pretend that I let him win, right?!
 My kids wanted in on the fun too, so we also made checkers pieces out of molds we got from Amazon and let them play a few rounds of checkers. Man they are competitive...they get that from me ;)
After several rounds of chess and checkers, we all got our just desserts, and got to eat our game. It was quite satisfying if I say so myself!